

手写Vue3初始化源码
发布于2021-05-30 12:27 阅读(1160) 评论(0) 点赞(12) 收藏(2)
一、Vue3优点
1.类型支持更好:
- vue2中使用new Vue的方式会产生动态的东西,像this
- 使用函数的方式,函数方式减少this的使用,有益于对ts的支持
2.利于tree-shaking:
- vue2中很多组件与vue实例连在一起,即便没有使用,还是会被打包,没法优化
- vue3中通过命名导出导入其中的大多数 API,以便打包器可以检测出未使用的代码并删除它们
3.API简化、一致性:render函数、sync修饰符,指令定义等
4.复用性:composition API
5.性能优化:响应式、编译优化
6.扩展性:自定义渲染器
二、vue3初始化
vue3初始化用法:
- <!DOCTYPE html>
- <html lang="en">
- <head>
- <meta charset="UTF-8" />
- <meta name="viewport" content="width=device-width, initial-scale=1.0" />
- <meta http-equiv="X-UA-Compatible" content="ie=edge" />
- <title>Document</title>
- </head>
- <body>
- <div id="app">
- <h3>{{ title }}</h3>
- </div>
- <script src="http://unpkg.com/vue@next"></script>
- <script>
- const { createApp } = Vue;
- const app = createApp({
- data() {
- return {
- title: "hello"
- };
- }
- });
-
- app.mount("#app");
- </script>
- </body>
- </html>
三、手写vue3初始化代码
整体思路:
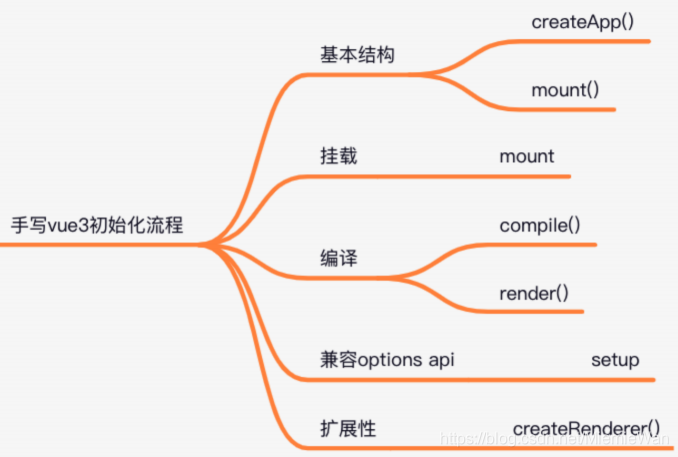
从上面的初始化代码可看出,要有以下几点:
1.createApp:从vue中导出createApp
2.mount:createApp()返回包含mount的对象
- const Vue = {
- createApp(options) {
- return {
- mount(selector) {
-
- }
- };
- }
- };
mount中会获取渲染函数,渲染DOM元素,并追加到宿主元素
3.compile:返回render函数
4.render:返回DOM元素
- const Vue = {
- createApp(options) {
- return {
- mount(selector) {
- const parent = document.querySelector(selector);
- // 获取渲染函数:模板=>渲染函数render
- if (options.render) {
- options.render = this.compile(parent.innerHTML);
- }
- // 渲染DOM,追加到宿主元素
- const el = options.render.call(options.data());
- parent.innerHTML = "";
- parent.appendChild(el);
- },
- // 将模板转化为渲染函数
- compile(template) {
- return function render() {
- // 描述视图
- // 假设返回h3
- const h3 = document.createElement("h3");
- h3.textContent = this.title;
- return h3;
- };
- }
- };
- }
- };
5.兼容composion API:用Proxy对属性进行监听,当setup中有该属性时,获取setup中的值,没有时再去data、methods等中查找
- <!DOCTYPE html>
- <html lang="en">
- <head>
- <meta charset="UTF-8" />
- <meta name="viewport" content="width=device-width, initial-scale=1.0" />
- <meta http-equiv="X-UA-Compatible" content="ie=edge" />
- <title>Document</title>
- </head>
- <body>
- <div id="app">
- <h3>{{ title }}</h3>
- </div>
- <!-- <script src="http://unpkg.com/vue@next"></script> -->
- <script>
- const Vue = {
- createApp(options) {
- return {
- mount(selector) {
- const parent = document.querySelector(selector);
- // 获取渲染函数:模板=>渲染函数render
- if (!options.render) {
- options.render = this.compile(parent.innerHTML);
- console.log(options.render);
- }
-
- // 将setup和data中的数据分别保存到app实例上,以便后面使用
- if (options.setup) {
- this.setupState = options.setup();
- } else {
- this.data = options.data();
- }
- // 兼容composition API
- this.proxy = new Proxy(this, {
- get(target, key) {
- if (key in target.setupState) {
- return target.setupState[key];
- }
- return target.data[key];
- },
- set(target, key, val) {
- if (key in target.setupState) {
- target.setupState[key] = val;
- } else {
- target.data[key] = val;
- }
- }
- });
-
- // 渲染DOM,追加到宿主元素
- const el = options.render.call(this.proxy);
- parent.innerHTML = "";
- parent.appendChild(el);
- },
- // 将模板转化为渲染函数
- compile(template) {
- return function render() {
- // console.log(this); //call绑定后this指向绑定的数据
- // 描述视图
- const h3 = document.createElement("h3");
- h3.textContent = this.title;
- return h3;
- };
- }
- };
- }
- };
- </script>
- <script>
- const { createApp } = Vue;
- const app = createApp({
- data() {
- return {
- title: "hello"
- };
- },
- setup() {
- return {
- title: "setup title"
- };
- }
- });
-
- app.mount("#app");
- </script>
- </body>
- </html>
6.createRenderer:渲染器,针对不同的平台环境,有不同的代码,增加代码的扩展性。
浏览器环境:设置一个通用的渲染器,将需要用到的dom操作作为参数传进去
- <!DOCTYPE html>
- <html lang="en">
- <head>
- <meta charset="UTF-8" />
- <meta name="viewport" content="width=device-width, initial-scale=1.0" />
- <meta http-equiv="X-UA-Compatible" content="ie=edge" />
- <title>Document</title>
- </head>
- <body>
- <div id="app">
- <h3>{{ title }}</h3>
- </div>
- <!-- <script src="http://unpkg.com/vue@next"></script> -->
- <script>
- const Vue = {
- createApp(options) {
- const renderer = Vue.createRenderer({
- querySelector(selector) {
- return document.querySelector(selector);
- },
- insert(child, parent, anchor) {
- parent.insertBefore(child, anchor || null);
- }
- });
- return renderer.createApp(options);
- },
- createRenderer({ querySelector, insert }) {
- // 获得渲染器
- return {
- createApp(options) {
- return {
- mount(selector) {
- const parent = querySelector(selector);
- // 获取渲染函数:模板=>渲染函数render
- if (!options.render) {
- options.render = this.compile(parent.innerHTML);
- console.log(options.render);
- }
-
- // 将setup和data中的数据分别保存到app实例上,以便后面使用
- if (options.setup) {
- this.setupState = options.setup();
- } else {
- this.data = options.data();
- }
- // 兼容composition API
- this.proxy = new Proxy(this, {
- get(target, key) {
- if (key in target.setupState) {
- return target.setupState[key];
- }
- return target.data[key];
- },
- set(target, key, val) {
- if (key in target.setupState) {
- target.setupState[key] = val;
- } else {
- target.data[key] = val;
- }
- }
- });
-
- // 渲染DOM,追加到宿主元素
- const el = options.render.call(this.proxy);
- parent.innerHTML = "";
- insert(el, parent);
- },
- // 将模板转化为渲染函数
- compile(template) {
- return function render() {
- // console.log(this); //call绑定后this指向绑定的数据
- // 描述视图
- const h3 = document.createElement("h3");
- h3.textContent = this.title;
- return h3;
- };
- }
- };
- }
- };
- }
- };
- </script>
- <script>
- const { createApp } = Vue;
- const app = createApp({
- data() {
- return {
- title: "hello"
- };
- },
- setup() {
- return {
- title: "setup title"
- };
- }
- });
-
- app.mount("#app");
- </script>
- </body>
- </html>
四、总结
vue3初始化中做了什么:
- vue3中初始化时设置了一个渲染器,返回createApp方法
- createApp方法返回一个mount方法
- mount方法里对composition API做兼容处理,获取渲染函数,渲染DOM并追加到宿主元素
- 初始化时调用的createApp中,获取设置好的渲染器并传入渲染参数,返回渲染器中的createApp方法
所属网站分类: 技术文章 > 博客
作者:前端黄柠檬
链接:http://www.qianduanheidong.com/blog/article/116067/d4a497fa23a09834b666/
来源:前端黑洞网
任何形式的转载都请注明出处,如有侵权 一经发现 必将追究其法律责任
昵称:
评论内容:(最多支持255个字符)
---无人问津也好,技不如人也罢,你都要试着安静下来,去做自己该做的事,而不是让内心的烦躁、焦虑,坏掉你本来就不多的热情和定力